Finger Taping in Volleyball: Reasons, Techniques, Benefits, and Alternatives
While other safety measures are considered in volleyball, finger taping might seem uncomfortable but it protects you from many injuries during the game. Without proper finger tapping, your nails might break, your fingers could bend, and you might even get fractures.
To prevent this, players wrap athletic tape around their fingers to maintain finger strength. There are different taping techniques players choose based on their needs. These include full finger taping for overall protection, buddy taping to support injured fingers, and more.
Before we discuss further, let’s start with why volleyball players tape their fingers, different techniques of taping, and how it helps them perform better on the court. If you want to know all this and more, read the article to the end.
Why Do Volleyball Players Tape Their Fingers
Volleyball players often tape their fingers for a variety of important reasons. This common practice isn’t just a ritual or superstition, but a crucial part of player preparation and protection. Some of the major reasons are:
1. Injury Prevention
One of the primary reasons volleyball players tape their fingers is to prevent injuries. Here’s how taping helps:
- Support for joints: Taping provides extra support to finger joints, reducing the risk of sprains and other injuries.
- Stabilization: It helps keep fingers stable during powerful hits and blocks.
- Cushioning: Tape softens the ball’s hit on fingers. It absorbs some force, making it hurt less.
2. Protection for Existing Injuries
Sometimes, players tape their fingers to protect and support already injured areas:
- Speeding up recovery: Taping can help players continue training or competing while recovering from minor injuries.
- Preventing further damage: It provides extra protection to healing fingers, reducing the risk of re-injury.
- Pain management: Taping can help reduce pain from existing injuries, allowing players to perform better.
3. Improved Grip and Ball Control
Taping fingers can actually enhance a player’s grip on the ball:
- Better friction: Tape can create more friction between the fingers and the ball, improving control.
- Consistent touch: Taping can help maintain a consistent feel for the ball, especially when hands get sweaty.
- Enhanced precision: With better grip comes improved accuracy in serves, sets, and spikes.
4. Psychological Comfort
For some players, taping fingers provides mental comfort:
- Confidence boost: Knowing their fingers are protected can make players feel more confident on the court.
- Routine and ritual: Taping can become part of a pre-game ritual, helping players get into the right mindset.
- Placebo effect: Even if the physical benefits are minimal, the belief that taping helps can improve performance.
How to Tape Volleyball Fingers?
Now that we understand why volleyball players tape their fingers, let’s look at how it’s done:
- Choose the right tape: Use athletic tape or volleyball-specific finger tape. In professional volleyball 2.5 cm wide tape is moistly used but you can also use 5cm wide tapes.
- Clean and dry your hands: Wash and dry your hands fully before you put on tape.
- Start at the base: Begin wrapping the tape at the base of the finger, just below the knuckle.
- Wrap upwards: Move the tape up the finger, overlapping each layer slightly.
- Cover the joint: Make sure to cover the finger joint for added support.
- Avoid wrapping too tightly: Wrap the tape tight enough to stay on, but not so tight it stops blood flow.
- Secure the end: Finish by securing the end of the tape so it doesn’t come loose during play.
- Check mobility: After taping, make sure you can still bend your fingers comfortably.
Finger Taping Techniques for Volleyball Players
Volleyball players use a variety of taping techniques to protect their fingers and enhance their performance on the court. Let’s explore some of the most common taping techniques used by volleyball players and understand how they contribute to safer and more effective gameplay.
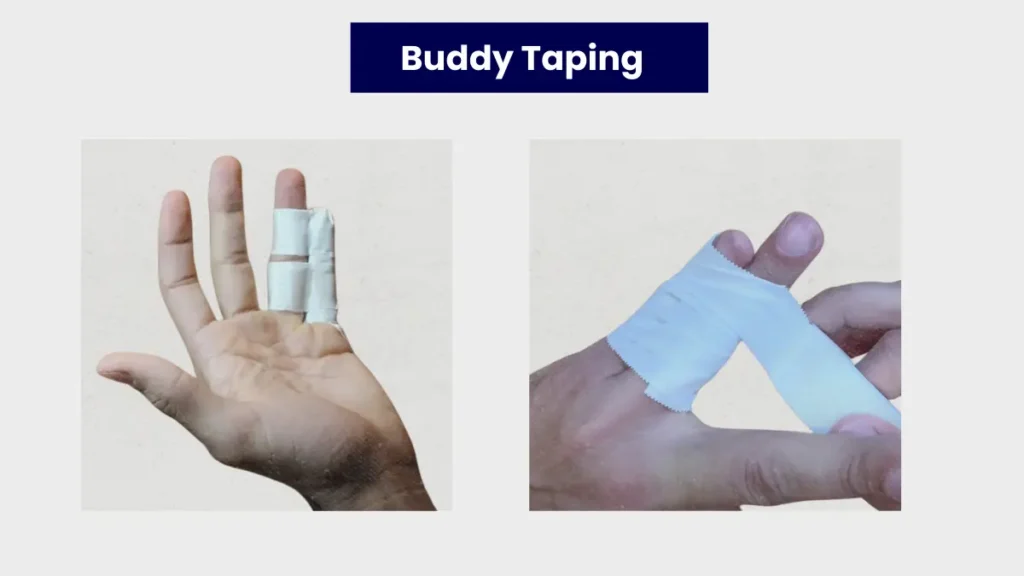
Strengthening Technique – Buddy Taping for Power
Volleyball players often face the challenge of protecting their fingers from the forceful impact of the ball. If you don’t protect your hands, one hit can really hurt and may injure you. That’s why many players turn to finger-taping for added strength and support during matches.
One effective method to enhance finger strength is the power or buddy taping technique. Here’s how to apply it:
- Start by cleaning and drying your hands thoroughly.
- Cut a strip of athletic tape about 10-12 inches long.
- Begin wrapping at the base of your finger, just below the knuckle.
- Spiral the tape upwards, overlapping each layer by about half the width of the tape.
- Keep wrapping the tape up to your finger’s top joint.
- For extra reinforcement, add a horizontal strip around the middle joint.
- To end, stick down the tape’s edge. Make sure it’s not squeezing too much.
This technique provides support while maintaining flexibility, allowing players to hit with confidence and reduce the risk of injury.
Partial Taping for Nail Protection – Safeguarding the Fingertips
Blockers, setters and defensive specialists often experience nail-related injuries due to frequent ball contact. Injuries can be small aches or big pains, which might hurt your playing. Proper taping can significantly reduce the risk of nail damage.
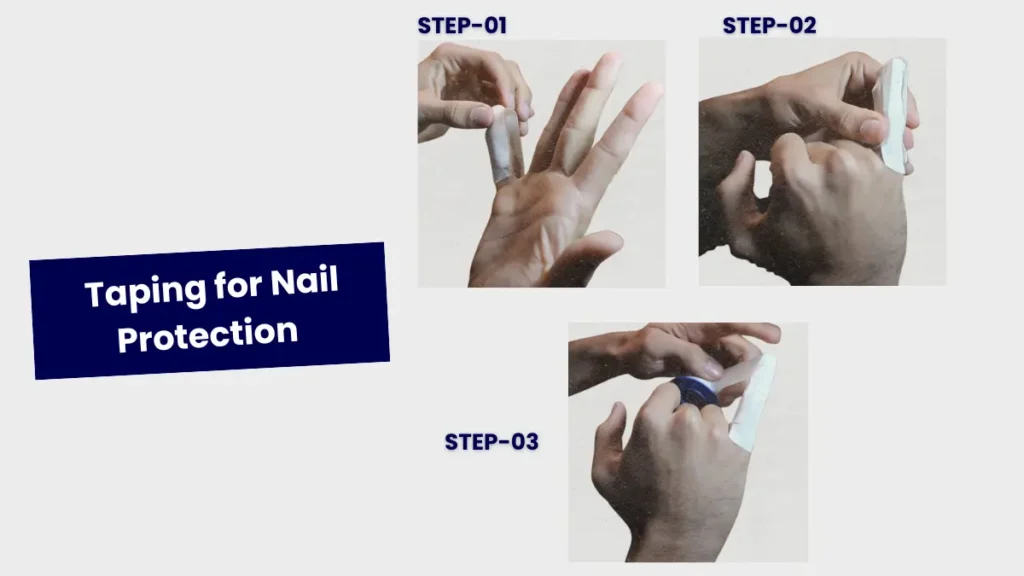
An effective method to protect your nails during volleyball:
- Gather athletic tape and scissors.
- Wash and dry your hands completely.
- Cut a piece of tape about 2 inches in length.
- Place one end of the tape on the pad of your finger, just below the nail.
- Stretch the tape gently over your fingertip and down the back of your finger, covering the nail completely.
- Push the tape down hard so it sticks well, especially near your fingernails.
- Cut a new piece of tape, 4 inches long.
- Wrap this piece around your fingertip, starting just below the nail, to secure the first strip in place.
This technique creates a protective barrier for your nails while maintaining finger sensitivity for optimal ball control.
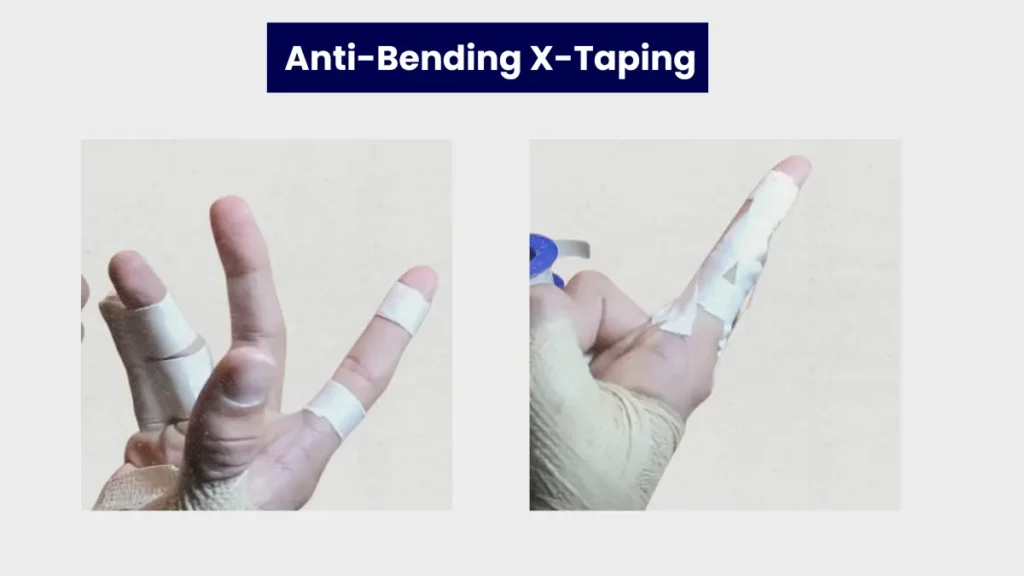
Anti-Bending X-Taping – Keeping Fingers Straight
When a finger is sore from overextension or minor injury, it’s crucial to limit its movement during play. This helps prevent further damage and reduces pain. The key is to create a supportive structure that keeps the finger straight while allowing some flexibility.
Follow these steps to tape your finger for restricted bending:
- Begin with clean, dry hands and athletic tape.
- Start wrapping just below the first knuckle, near the base of the finger.
- Take two pieces of tape and wrap around the finger, below and above the knuckle i.e. excluding the finger joint
- Next, angle the tape diagonally across the back of the knuckle.
- Bring the tape under the finger and up the opposite side.
- Cross back over the top of the finger, forming an X pattern.
- Finish with another complete wrap to secure everything in place.
This technique provides stability to the finger joint, limiting backward bending while still allowing some forward motion for gameplay.
Injury Support Taping – For Sprained or Hurt Fingers
Finger sprains are common in volleyball, often resulting in pain, swelling, and limited mobility. While rest is important for healing, proper taping can provide support if you need to play or practice with a minor injury. Remember, always consult a medical professional before playing with an injured finger.
Follow these steps to tape a sprained finger for volleyball:
- Clean and dry your hands before you begin taping.
- Cut several strips of athletic tape, about 4-5 inches long each.
- Begin by wrapping a thin layer of pre-wrap around the injured finger for skin protection.
- Start taping at the base of the finger, wrapping around 2-3 times for a secure foundation.
- Wrap up your finger. Each new wrap should cover half of the last one.
- Pay extra attention to the injured joint, adding an extra layer of support.
- Finish just below the fingertip, ensuring circulation isn’t restricted.
This method provides stability to the injured finger while allowing some flexibility for gameplay. For practical demonstration
Pros and Cons of Taping Volleyball Fingers
Taping helps, but it also has good and bad points, just like other safety steps. Let’s examine the pros and cons of taping volleyball fingers to help players make informed decisions about this technique.
Pros
- Reduces the risk of injuries
- Provides support for existing injuries
- Improves grip and ball control
- Offers psychological comfort
- Can help manage pain from minor injuries
Cons
- It may limit finger flexibility if not done correctly
- Takes time to apply before each game or practice
- It can be an ongoing expense for players
- It may cause skin irritation for some people
- This could create a dependency, making players feel less confident without tape
Things To Consider While Tapping
Alternatives to Finger Taping in Volleyball
While finger taping is popular, it’s not the only way to protect your hands in volleyball. Some players prefer different methods that offer similar benefits. Let’s discuss some alternatives to traditional finger taping.
Finger Sleeves
These are fabric or silicone covers that slip over individual fingers. They offer protection without the need for taping.
Volleyball Gloves
Some players use specially designed volleyball gloves that provide padding and support.
Strengthening Exercises
Regular hand and finger exercises can help build strength and reduce the need for taping.
Proper Technique Training
Learning and practicing correct volleyball techniques can reduce the risk of finger injuries.
When to Seek Medical Advice for Volleyball Finger Injuries
Finger taping can be helpful for minor volleyball-related finger injuries, but it’s not a cure-all. Some injuries require professional medical attention. It’s crucial to recognize when a problem goes beyond what taping can handle.
- Severe pain or swelling in fingers or hands
- Inability to move fingers normally
- Visible deformity in fingers
- Pain that stays bad even after resting and using ice.
- Any injury that affects your ability to play or perform daily activities
Tips for Maintaining Healthy Fingers in Volleyball
Keeping your fingers healthy is important for any volleyball player. While taping can help, there are other important steps you can take to protect your fingers. Some tips to follow:
- Warm up properly: Always warm up your hands and fingers before playing.
- Use correct techniques: Learn and practice proper volleyball techniques to minimize stress on your fingers.
- Stay hydrated: Drinking enough water keeps your joints moving well and flexible.
- Take breaks: Give your hands and fingers rest periods during long practice sessions.
- Strengthen your hands: Do regular exercises to build hand and finger strength.
- Maintain good nutrition: Consume a diverse array of nutrient-rich foods that promote optimal joint function.
- Use appropriate equipment: Make sure you’re using the right size and type of volleyball for your level of play.
Last Words
To sum up, taping fingers is a common practice in volleyball for good reasons. It helps prevent injuries, supports healing, improves grip, and can boost a player’s confidence. However, it’s not a one-size-fits-all solution. Each player should evaluate their specific requirements and inclinations when determining whether to implement finger-taping protocols.
Frequently Asked Questions
Is it necessary for all volleyball players to tape their fingers?
Not all players need to tape their fingers. It’s a personal choice based on individual needs, playing style, and any existing injuries. Some players find it helpful, while others prefer to play without tape.
How often should I replace the tape during a game?
You should replace the tape if it becomes loose, wet, or dirty. In a typical match, you might need to re-tape once or twice. Always carry extra tape for quick replacements during timeouts or between sets.
Can finger-taping affect my performance negatively?
If done incorrectly, taping can limit finger mobility and affect your feel for the ball. It’s important to carefully balance finger safety with the ability to move them well. Practice with taped fingers to get used to the sensation before using it in a match.
What is buddy-taping fingers in volleyball?
Buddy taping in volleyball is a technique where two adjacent fingers are taped together, usually with a thin piece of gauze between them to prevent friction. This method is commonly used for minor sprains or after jamming a finger, providing support for an injured or weak finger, distributing force between fingers during play, and reducing stress on a single digit.